
Cleaning Cart Games for Retro Console: How to Safely Clean Your Retro Game Cartridges
You pop your favorite game into your console, flip the power switch, and… nothing. Just a blank, black screen staring back at you.
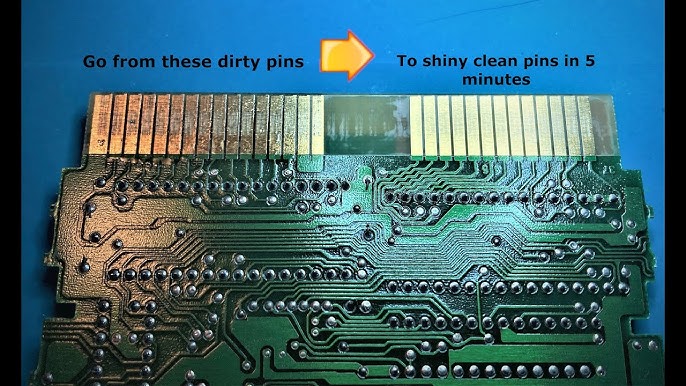
Before you panic and assume your console or cartridge is dead, take a breath. Whether you are dealing with an NES, SNES, N64, SEGA Master System, Mega Drive, or even a finicky Saturn expansion slot, the most common reason a game won’t boot is simple: corrosion and tarnish on the cartridge pins. Cleaning cartridge games were primarily produced for the NES and SNES.
When inspecting a cart, always check the pins for visible dirt, corrosion, or damage, as these can affect performance. Some carts can be more challenging to clean or open due to their design.
- How to fix black screen of death? Clean your games.
- Why is my Nintendo on but the screen is black? Clean your games.
- Why is my game showing black screen? Clean your games.
- N64 black screen reddit. Clean your games.
- N64 turns on but no picture or sound. Always reseat the Expansion or Jumper Pak, then give the expansion pak a good clean, the same as a game.
Here is exactly why this happens and how to fix it like a professional.
Introduction to Cartridge Cleaning
Keeping your NES games and other retro game cartridges in top shape isn’t just a good idea—it’s essential if you want your collection to continue running smoothly for years to come. Over time, dirt, corrosion, and stubborn residue can build up on the pins and contacts inside your cartridge, leading to all sorts of problems: games that freeze, fail to launch, or display the dreaded black screen. This article will walk you through the cleaning process step by step, helping you avoid common pitfalls and troubleshoot any issues that might pop up along the way. Whether you’re dusting off a childhood favorite or adding a new find to your shelf, understanding how to properly clean your cartridges will ensure your games keep working and your system stays healthy.
The Real Enemy: Stop Blowing on Your NES Games!
We have all done it. Back in the day, if a game didn’t work, you pulled it out, gave it a massive blow, and popped it back in. It seemed to work like magic.
But here is the truth: blowing on your games is what actually destroys them. Your breath contains moisture. When you blow into the cartridge, that moisture settles on the copper edge pins. Over decades, that microscopic layer of spit causes the metal to corrode and tarnish. Eventually, the tarnish builds up so thick that the game pins can no longer make electrical contact with the internal slot of the console.
A Note on Retro Sales Consoles: > Every single console set we ship is fully tested and verified before it leaves our hands. We test the entire ecosystem—the power supply, the AV cables, the controllers, and the console motherboard. If you bought your setup from us, the console is rock-solid. The culprit is almost always a dirty cartridge you’ve recently picked up from Facebook Marketplace, eBay, or a garage sale.
It's advisable to open the cartridge to examine the internal components, especially if the cartridge is valuable. Cartridges can appear clean on the outside but may still have hidden corrosion or internal issues that are only visible once the cartridge is opened.
Preparing for Cleaning
Before you start the cleaning process, it’s important to set yourself up for success. Gather your basic tools: a Q-tip for precise scrubbing, 91% or higher isopropyl alcohol for effective residue removal, a soft eraser for stubborn spots, and a gentle brush to sweep away loose dirt. Keep a paper towel or soft cloth handy to wipe away any grime you loosen during cleaning. If you’re working near your computer or other electronics, take precautions against static discharge—using an anti-static wrist strap or mat is a smart move to prevent accidental damage to your cartridge. Taking a few minutes to prepare your workspace and materials will make the cleaning process easier, safer, and more effective, helping you avoid unnecessary damage and get the best results every time you start.
The Ultimate Game Cartridge Cleaning Kit
You don’t need expensive, gimmicky cleaning kits to restore your games. You only need two things:
-
High-quality Cotton Buds (Q-tips)
-
99% Isopropyl Alcohol (IPA) Do not use water, window cleaner, or rubbing alcohol that contains additives. You want pure isopropyl because it strips away grease and tarnish instantly and evaporates completely without leaving moisture behind. While 99% is ideal, 91% isopropyl alcohol is also recommended for cleaning game cartridge contacts, as it evaporates quickly and leaves less residue compared to lower concentrations. However, 70% isopropyl alcohol is generally fine for most cleaning purposes and will adequately clean pins and cartridges if higher concentrations are unavailable.
A common method to clean cartridge contacts is to use a pink block eraser to scrub the pins, then remove any residue by wiping with a cotton swab dipped in isopropyl alcohol. For heavy corrosion, metal polishes such as Brasso or other metal polishes can be used, but it is important to thoroughly remove all residue to avoid any negative effects on electronics. DeoxIT is a specialized cleaning solution that can perform better than isopropyl alcohol or erasers, effectively cleaning contacts without damaging the gold plating on cartridge pins.
We highly recommend picking up Diggers Isopropyl Alcohol from Bunnings. It’s inexpensive, highly effective, and the exact tool we use on our own repair benches.
Step-by-Step Cartridge Restoration Process
The retro community widely recommends a few staple methods for cleaning physical retro cartridges. Follow this high-level cleaning process to bring your dirty marketplace finds back to life:
-
Open the cartridge if possible. Some cartridges require a special Nintendo style screwdriver due to unique screw types like tri-wing or flathead screws. This allows you to access the contact pins and circuit board for a thorough cleaning.
-
For a quick clean, select a clean end of a pencil eraser or a white eraser—both are great things to try for removing a bit of dirt from the contact pins. Gently press and rub the eraser along the pins, then turn the eraser to a clean section as you go to avoid redepositing grime. Repeat this process on the other side of the pins to ensure both sides are clean.
-
If using a cotton bud with isopropyl alcohol, select a fresh, clean tip and press gently but firmly as you wipe the contacts. Turn the bud frequently to expose a clean area for each pass, and make sure to clean the other side of the contacts as well.
-
Reassemble the cartridge, pressing the circuit board back into place carefully. Test the game to confirm improved connectivity and gameplay reliability.
Step 1: Soak the Q Tip
Generously dip one end of a cotton bud into your isopropyl alcohol. Soaking the cotton bud prepares it to access and clean the pins thoroughly. You want it wet, but not completely dripping.
Step 2: Scrub the Game Pins with Other Metal Polishes
Firmly press the wet tip against the gold or copper edge pins inside the cartridge opening and rub from left to right. For best results, use 91% isopropyl alcohol, as it evaporates quickly and reduces the risk of corrosion compared to lower concentrations. You will instantly see decades of black tarnish transfer onto the white cotton bud. Use the dry end of the bud to buff the pins dry.
Step 3: Clean Both Sides
Flip the cartridge over and repeat the exact same scrubbing process on the back row of pins, making sure to clean the other side as well. Clean both sides thoroughly until your cotton buds come away perfectly white. For stubborn dirt, using a white eraser is an effective method, as it is soft enough not to cause damage while cleaning the contacts.
Step 4: Clean the Console's Internal Slot
If the game was filthy, some of that tarnish has likely transferred inside the console itself. Wet a clean cotton bud with isopropyl alcohol again, rub it gently across the cartridge pins to help remove dirt from the internal slot, and insert the wet game into the console slot. Pop it in and out 3 to 4 times. This safely transfers the alcohol into the internal slot pins to break down dirt inside the machine.
Step 5: Clean the Console's Internal Slot
Deep Cleaning the Console Slot (The Credit Card Trick)
If a game was filthy, a lot of that black tarnish has likely transferred inside the console's internal pin slot. Cleaning the cartridge isn't enough if the console's slot is full of grime.
To clean those hard-to-reach internal pins, use the white cloth method:
- Cut the Cloth: Cut a small square out of an old white T-shirt, roughly 8cm x 8cm.
- Wrap the Card: Place an old credit card or plastic gift card inside the cloth, wrapping the fabric tightly over the long edge of the card.
- Wet with IPA: Wet the cloth-covered edge of the card with your isopropyl alcohol.
- Insert and Clean: Push the cloth-covered card straight down into the console’s cartridge slot, then pull it back out. Repeat this firm in-and-out motion a few times.
- Because of the card's exact thickness, the wet cloth creates the perfect fitment and friction to scrub the internal pins clean. When you pull the card out, you’ll see distinct black lines of tarnish transferred onto the white cloth—proving just how much dirt was trapped inside the machine.
Step 6: Power On
Give it about 30 seconds to fully evaporate, then push the cartridge firmly into place. Flip the power switch on your console and make sure the red power light is on.
Your game should run or launch instantly with crystal-clear audio and video!
Got a game or console that still won’t behave after a deep clean? It might need component-level restoration. Send it to the experts at Retro Sales Repairs
Common Mistakes to Avoid
When it comes to cleaning your game cartridge, a few simple missteps can cause more harm than good. Avoid using harsh chemicals or abrasive materials—these can scratch or corrode the delicate pins and contacts, leading to bigger problems down the line. Don’t soak your cartridge in liquid or use too much alcohol; excess moisture can seep inside and damage the internal components. Always handle the pins and contacts with care, and never touch them with your bare hands, as oils from your skin can accelerate corrosion. Be gentle during the cleaning process to avoid bending or scratching the pins, which can affect how well your games continue to work. By steering clear of these common mistakes, you’ll help ensure your cartridges stay in great shape and keep playing without issues.
Troubleshooting
If you’ve followed the cleaning process but your cartridge still isn’t working, don’t worry—there are a few more steps you can try. First, repeat the cleaning process, making sure you thoroughly scrub the pins and contacts. Inspect the cartridge closely for any signs of corrosion or physical damage that might be causing problems. If you spot stubborn grime, consider using a dedicated electronic contact cleaner or a different cleaning method. Sometimes, the issue might be with the console’s slot rather than the cartridge itself, so check both sides if you’re still having trouble. If all else fails and the game still won’t launch, it may be time to consult a professional or consider replacing the cartridge. Taking these troubleshooting steps can help you pinpoint the exact problem and get your games running again.
Best Practices for Maintenance
To keep your game cartridges working long into the future, it’s a good idea to follow some simple maintenance habits. Regularly clean your cartridges and store them in a cool, dry place away from direct sunlight and moisture to prevent damage. Handle your cartridges by the plastic shell, avoiding direct contact with the pins and contacts to reduce the risk of corrosion. Investing in a cartridge cleaning kit or other specialized tools can make the cleaning process even easier and more effective. Always check the manufacturer’s instructions for any specific recommendations, and take your time when cleaning or handling your games to avoid accidental damage. By following these best practices, you’ll help ensure your cartridges continue to work perfectly and provide hours of classic gaming fun.